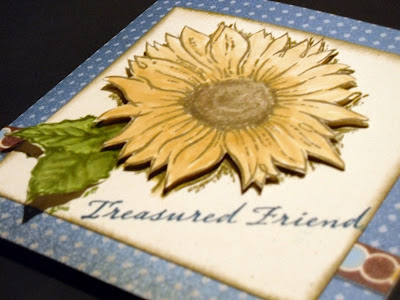
Sunflowers,
summer, shades of yellows and blues are all things that make me feel
warm and fuzzy inside. Here in Texas May is when Summer really starts
to hit; the temperature soars into the 90s, pools are filled, the
days are long and bright. Big, Bright, Sunny Yellow Sunflowers are
just the perfect mate for May.
I
have been thinking a lot about my girls lately. Usually we try to get
together once a month for girl time but the last couple of months
have been crazy for us and we just haven't had the chance. So to let
them know that I still know they exist and to let them know I am
thinking about them I wanted to make them something. Close To My
Heart's May 2012 Stamp of the Month, Friendship Bouquet, is the
perfect set to let them know I am thinking about them.
Creating
this card was simple. First stamp the large sunflower in Chocolate on
a 4” square of Colonial White toward the top left corner. Heat set
with a heat gun. This will ensure the ink is completely dry and set
so that when coloring it in with a blending pen the original image is
less likely to run. You could use a solvent-based ink like Brown
Staz-On, but I hate to stain my stamps so I take my chances with the
heat set method. In most cases I notice the paper will start to pile
before the ink will run badly enough to affect the end result.
Next
take out a blender pen and your Crème Brulee, Chocolate, and Olive
ink pads. Squeeze top of your ink pad to transfer some of the ink
from the pad to the lid. (If you don't like to do this then you can
use a drop of the matching re-inker in the lid, use the re-inker tip
while open to spread the ink out a little bit.)
Using
the brush tip of your blender pen begin to pick up a little bit of
Buttercup and test on a scrap piece of paper.
If
the color is the saturation you want start to color in the stamped
sunflower image. If it seems too light then pick up a bit more ink,
if too dark continue to color out on the scrap until you get to the
desired shade.
Remember
that as you color your image the blender pen will slowly fade to
clear. That being the case, start in the areas you want shaded and as
the color begins to fade move towards the edges where you want the
color to be lighter. After completing the petals of the flower, color
all of the Crème Brulee out on a scrap piece of paper. Next move
onto the center in Chocolate and repeat the process. Finally stamp 2
leaves in Olive and blend as well.
To achieve a 3D flower just stamp and
blend on a scrap piece of paper, fussy cut a flower and extra leaves.
Sponge the edges of the base square in Chocolate, and put down the
matching zip strip (I love those things!) Now pop up the extra
flowers and leaves on 3D foam tape and align with the originally
stamped image. Now as much as I like it now, I DO NOT like to fussy
cut! This was a happy accident. I had accidentally smudged the flower
while taking step by step pictures so I had to do something to hide
save it.
For
the final finishing touch stamp “Treasured Friend” in Pacifica on
the front bottom right corner. If you have time (which I usually
don't) covering the center in Liquid Glass adds a bit more dimension.
For those girly girls out there add a sprinkle of Prisma Glitter to
the top of the Liquid Glass before it dries for a see through sparkle
and added glam.

Don't
forget about the inside! Stamp the stemmed sunflower in Desert Sand
and another sentiment in Pacifica on a 4” square of Colonial White.
Inside adhere a 1” by 5” scrap of matching paper (faux zip
strip), and then the stamped square of Colonial White. Write a
personal note, sign, seal, and deliver to that special friend. Girls
keep your eyes on the mail box, it's already on it's way.
Supply
List:
Cardstock:
Colonial White, Dreamin' (retired) but Pemberly would be lovely as
well.
Inks:Crème Brulee, Chocolate, Olive, Pacifica. (Alternatives BrownStazOn, or Archival Black)
Embellishments:
Liquid Glass and Prisma Glitter
Tools:
Blender Pen and 3D Foam Tape
P.S. This was my first tutorial! I would love to hear you thoughts about how I did and how I can improve. Thank you so much for looking! Until next time...


No comments:
Post a Comment